Smokes your problems, coughs fresh air.

Tag: X (Page 1 of 2)

Awesome window manager

I’m officially a convert. I finally went from a floating-only window manager to a tiling window manager. And it does floating too! Awesome seems to be everything that Window Maker just couldn’t be for me.

For a very long time I’ve known that a tiling WM would probably be nicer for me, but there were quite a few to choose from. After looking at the likes of Ion, I ended up looking at Ratpoison when I noticed that the successor to Ratpoison, StumpWM, was based on LISP. Since I never could get the hang of Emacs, this looked like another excellent opportunity to learn LISP.

Sadly, StumpWM is quite a piece of crap with only a very limited feature set and some initial stumbling blocks I just couldn’t get over. My first enthusiasm was tempered by some random errors and my inability to configure it in such a way that I could use my Windows key (Mod4) instead of the GNU Screen like Ctrl-f prefix. It turned out that I couldjust the Mod4 modifier. StumpWM seemed to insist on me using a kind of prefix made of any number of modifiers combined with a regular key.

Luckily, I came across Awesome, which, until now, really seems awesome.

The default configuration comes with a lot of niceness right away.

One thing I particularly like are its default key bindings, mostly because they all use some combination of the Windows/Mod4 key. Some defaults are even exactly the same as I had configured them in Window Maker, such as Mod4-r to type the name of a program to execute and Mod-1 through Mod-9 to switch between Workspaces called tags in Awesome. For as far as the key bindings are different, I actually like them more than what I’ve used before. Most of the key bindings, however, are of course new because they simply weren’t available in Window Maker (or other tiling window managers), often much to my chagrin.

I thought that when switching to a tiling window manager, I’d probably have to get something like Gkrellm for my system monitors and system tray and such, but Awesome actually sports many of these. The Gentoo default configuration even has the system tray already enabled in the statusbar. This is particularly nice because of the crappyness of the available systray DockApps for Window Maker that I had gotten used to.

I’m not yet done playing with Awesome. I like that I probably will never stop tuning it to my preferences and the Lua configuration format means I don’t have to. It’s a modern window manager which supports the latest FreeDesktop standards and it is infinitely lean, mean and flexible. What’s not to like? I’ll comment when I find out. 😉

XSel, for command-line operations on X selections

Since I first learned that Windowmaker installs two command-line tools, wxcopy and wxpaste, to play around with X selections, I have wanted to be able to make and use X selections from my Bash shell. wxcopy and wxpaste never did what I expected them to do, so I gave up until recently I learned about all the different X selections.

By default, wxcopy and wxpaste operate on the CUT_BUFFER[n] selections. These are deprecated. That’s why I could never make it work, because modern applications use only CLIPBOARD and SELECTION. So, wxcopy is pretty useless (unless its used to copy something to paste with wxpaste). With this knowledge wxcopy does seem useful thanks to its -selection [selection-name] flag, but this doesn’t seem to work; I only get the contents of CUT_BUFFER. This is not how the feature is advertised:

-selection [selection-name]
The data will be copied from the named selection. If cutting from the selection fails, the cutbuffer will be used. The default value for the selection name is PRIMARY.

Enter XSel

Fortunately, there’s XSel by Conrad Parker, a program which made him passionately hate the ICCCM.

XSel does exactly what it advertises. I’m actually surprised that I never heard of it before. It’s available in Gentoo, Debian and Ubuntu, so it’s a breeze to install.

Among its features are: --append, --follow, --clear, --delete (very weird, but logical if you understand X IPC), --primary, --secondary, --clipboard, --keep, and --exchange. Read the man page for more. It’s an excellent read.

One of the places where I’m going to use this tool is when copy-pasting to and from VIM. I really like how this compares to using :insert or :r!cat</dev/tty and then using the pointer to paste (or (Shift+)Insert with my custom XTerm config). Now, to paste something in VIM, I can simply type:

:r!xsel

I use the following to copy any amount of text from VIM. This works much better than fooling around with the mouse:

:'>,'> !tee >(xsel -i)

The '>,'> range is entered automatically if you press : while in visual (selection) mode. You could enter any range there, or even % to select the whole file. To copy to the CLIPBOARD instead of the PRIMARY, use xsel -i -b in the above example.

If someone know of a way to make VIM pipe something to a program without replacing the given range with that program’s output, I could simplify this…

Copy-pasting to and from XTerms

By default, XTerms only supports the PRIMARY selection for copy and paste. The PRIMARY selection is the one that is used by most ‘modern’ X application when you select text. This text can then usually be pasted by clicking the middle/second mouse button. Because this selection is set whenever you select, it’s easily overwritten, often accidentally. That’s why most newer X apps offer a parallel copy/paste mechanism where the selection is only explicitly set by choosing “Cut” or “Copy” from the application’s “Edit” menu or from its context menu (or with the Control-X/C/V keyboard shortcuts). In X, this selection is called CLIPBOARD, just like in Windows where it’s the only selection.

X also has these selections called Cut Buffers, but these are considered obsolete. Maybe that’s just too bad, because they appear to be the only selections with persistence; the other selections, PRIMARY and CLIPBOARD, disappear when the application is quit. Apparently, this is a feature, because it enables content negotiation.

Anyway, XTerm can be configured to do anything and I want it to be CLIPBOARD aware, for two reasons: one is that I often copy things from applications that can only set the CLIPBOARD selection; another is that I want to be able to really copy something from the XTerm, without losing it as soon as I select something else (especially if that something else is something I want to replace with the selection).

So, I added the following to my VT100.Translations #override in .Xdefaults.XTerm:

XTerm*VT100.Translations: #override \
    ShiftInsert: insert-selection(CLIPBOARD) \n\
    Insert: insert-selection(PRIMARY) \n\
    Shift: insert-selection(CLIPBOARD) \n\
    Shift: select-start() \n\
    Shift: select-extend() \n\
    Shift: select-end(CLIPBOARD)

What this does:

  • This gives me an XTerm that pastes the content of the CLIPBOARD when I hold down Shift during my two-finger tab (I’m using a touchpad, so that works as a Btn2).
  • Because I don’t like moving my hands, I can do the same by pressing Shift+Insert.
  • I can use my Insert key without Shift to paste the PRIMARY selection.
  • To copy something to the clipboard, I hold down the Shift key while making the selection.

That’s how you can make use of the CLIPBOARD from your XTerm.

Sources

If you want to learn more.

Old Window Maker screenshot from April 2004

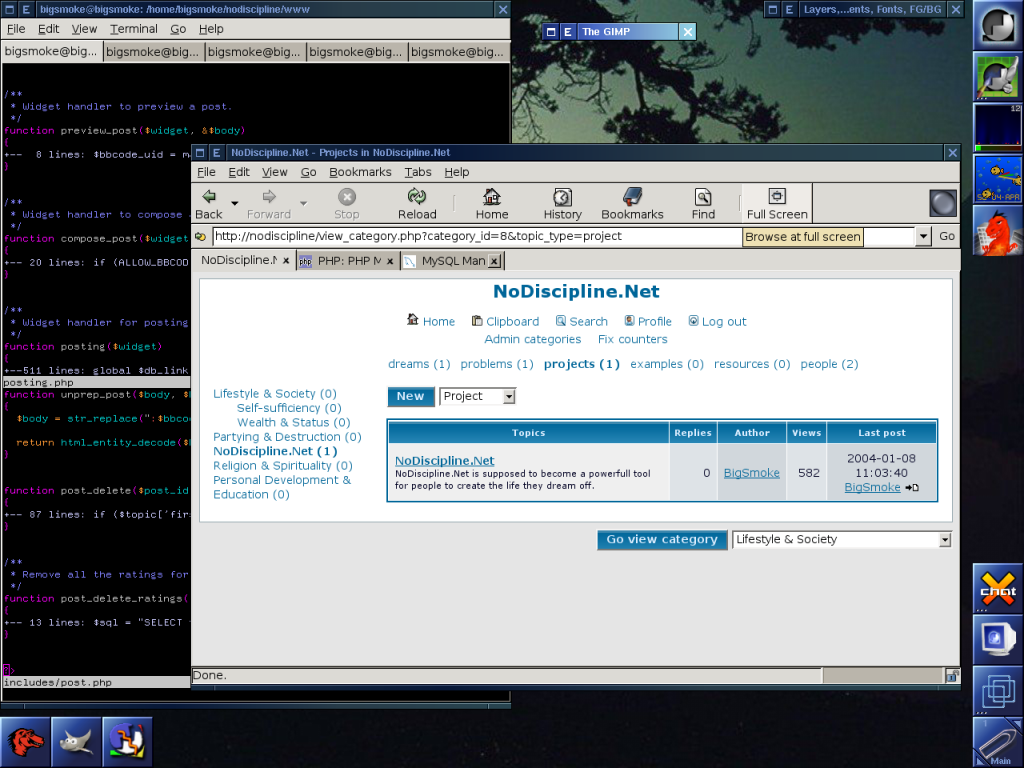
While cleaning up old images, I came across a screenshot of an old Window Maker configuration that I ran in 2004. It looks a bit different from my current configuration, but not that different, which just goes to say how little Window Maker has changed in the last five years. The main difference I see in terms of Window Maker capabilities is that Window Maker now has font anti-aliasing support.

I notice that I was actually using VIM’s folding support at the time. Also, it’s funny to see that I was in the middle of the development of a (now stale, even more badly written) fork of phpBB.

Window Maker Workspace (2004)

Window Maker Workspace (2004)

Configuring X input devices through HAL

When I went from X.org < 7.3 to X.org > 7.3, I had to make some changes to my X input configuration.

First of all, I had to replace x11-drivers/synaptics (http://web.telia.com/~u89404340/touchpad/) with the newer x11-drivers/xf86-input-synaptics, which is automatically installed if you set INPUT_DEVICES="${INPUT_DEVICES} synaptics" or if you add “x11-base/xorg-server input_devices_synaptics” to /etc/portage/package.use.

Starting with X.org 7.3, you’re supposed to use HAL for all the X input configuration. All the "InputDevice" sections have to be removed from xorg.conf (and of course the references in "ServerLayout"). If you don’t want this, you can add the following options:

Section "ServerFlags"
  Option "AllowEmptyInput" "off"
  Option "AutoEnableDevices" "off"
EndSection

I chose HAL. I wanted to replicate the following settings using HAL.

Section "InputDevice"
    Identifier "Keyboard1"
    Driver     "kbd"
    Option "AutoRepeat" "500 30"
    Option "XkbRules"  "xorg"
    Option "XkbModel"  "thinkpadintl"
    Option "XkbLayout" "us"
    Option "XkbOptions"        "ctrl:nocaps,altwin:menu,compose:ralt,eurosign:e"
EndSection
 
Section "InputDevice"
    Identifier "Synaptics Touchpad"
    Driver     "synaptics"
    Option "SendCoreEvents" "true"
    Option "Device" "/etc/psaux"
    Option "Protocol"    "auto-dev"    # Auto detect
#    Option "TouchpadOff" "1" #Uncomment if you just want to disable the touchpad and use only the trackpoint
#    Option "HorizScrollDelta" "0" #Why is this in here by default. By Gods, it kill horizontal scrolling!
    Option "RightEdge" "5500" #This is a little bigger than the default narrowing the scroll region
    Option "BottomEdge" "4500" #This is a little bigger than the default narrowing the scroll region
    Option "RTCornerButton" "0" #disable Right Top corner "button" 
    Option "RBCornerButton" "0" #disable Right Top corner "button" 
    Option "SHMConfig" "on" #this allows configuration of the touchpad using qsynaptics, synclient, or what have you
EndSection

The keyboard part was easy. I copied /usr/share/hal/fdi/policy/10osvendor/10-keymap.fdi to /etc/hal/fdi/policy/99-keymap.fdi and made a few adjustments:

<?xml version="1.0" encoding="ISO-8859-1"?> <!-- -*- SGML -*- -->
<deviceinfo version="0.2">
  <device>
    <match key="info.capabilities" contains="input.keymap">
      <append key="info.callouts.add" type="strlist">hal-setup-keymap</append>
    </match>
 
    <match key="info.capabilities" contains="input.keys">
      <merge key="input.xkb.rules" type="string">xorg</merge>
 
      <!-- If we're using Linux, we use evdev by default (falling back to
           keyboard otherwise). -->
      <merge key="input.xkb.model" type="string">thinkpadintl</merge>
      <match key="/org/freedesktop/Hal/devices/computer:system.kernel.name"
             string="Linux">
        <merge key="input.xkb.model" type="string">evdev</merge>
      </match>
 
      <merge key="input.xkb.layout" type="string">us</merge>
      <merge key="input.xkb.variant" type="string" />
      <merge key="input.xkb.autoRepeat" type="string">500 30</merge>
      <merge key="input.xkb.options" type="string">ctrl:nocaps,altwin:menu,compose:ralt,eurosign:e</merge>
    </match>
  </device>
</deviceinfo>

The Touchpad configuration was a little more involving, because I added a few options which, before, I didn’t know the thing supported. 99-x11-synaptics.fdi:

<?xml version="1.0" encoding="ISO-8859-1"?>
 
<deviceinfo version="0.2">
  <device>
    <match key="info.capabilities" contains="input.touchpad">
 
    <merge key="input.x11_driver" type="string">synaptics</merge>
    <!-- Arbitrary options can be passed to the driver using
         the input.x11_options property since xorg-server-1.5. -->
 
    <!-- Switch on shared memory, enables the driver to be configured at runtime -->
    <!-- This allows configuration of the touchpad using qsynaptics, synclient, or what have you -->
    <merge key="input.x11_options.SHMConfig" type="string">on</merge>
 
    <!-- Enable vertical scrolling by dragging your finger along the right edge -->
    <merge key="input.x11_options.VertEdgeScroll" type="string">1</merge>
 
    <!-- Enable horizontal scrolling by dragging your finger along the left edge -->
    <merge key="input.x11_options.HorizEdgeScroll" type="string">1</merge>
 
    <!-- This is a little bigger than the default narrowing the scroll region -->
    <merge key="input.x11_options.RightEdge" type="string">5500</merge>
 
    <!-- This is a little bigger than the default narrowing the scroll region -->
    <merge key="input.x11_options.BottomEdge" type="string">4500</merge>
 
    <!-- disable Right Top corner "button" -->
    <merge key="input.x11_options.RTCornerButton" type="string">0</merge>
 
    <!-- disable Right Bottom corner "button" -->
    <merge key="input.x11_options.RBCornerButton" type="string">0</merge>
 
    <!-- Enable vertical scrolling when dragging with two fingers anywhere on the touchpad -->
    <merge key="input.x11_options.VertTwoFingerScroll" type="string">1</merge>
 
    <!-- Enable horizontal scrolling when dragging with two fingers anywhere on the touchpad -->
    <merge key="input.x11_options.HorizTwoFingerScroll" type="string">1</merge>
 
    <!-- Enable tapping to emulate mouse buttons -->
    <merge key="input.x11_options.TapButton1" type="string">1</merge>
    <merge key="input.x11_options.TapButton2" type="string">2</merge>
    <merge key="input.x11_options.TapButton3" type="string">3</merge>
 
    <!-- Maximum movement of the finger for detecting a tap -->
    <merge key="input.x11_options.MaxTapMove" type="string">221</merge>
 
    <!-- For other possible options, check CONFIGURATION DETAILS in synaptics man page -->
</match>
</device>
</deviceinfo>

I’m still not completely satisfied with the Touchpad configuration (actually less so than before I started messing with HAL), so I wrote a little tool to be able to mess around with my configuration a little bit easier.

Introducing synclient-sync

With SHMConfig on, you can use the synclient program to make changes to the touchpad configuration without having to restart X. I decided that it would be handy if I could utilize this to test out changes I made to the HAL config file without having to reload it, so I wrote a little script which detects the differences between the current (live) configuration and the configuration in the HAL .fdi file. The running configuration is then updated to reflect the changes in this file. (Newer versions of the script can be found on GitHub)

#!/bin/bash
 
HAL_FILE=/etc/hal/fdi/policy/99-x11-synaptics.fdi
 
VERBOSITY_LEVEL=2
 
usage()
{
    cat <<EOF
Usage: $0 options
 
OPTIONS:
--verbosity [level] Control the level of output processed by the script.
Level 0: No output at all
Level 1: Only output changed options
Level 2: Only output options the configuration file
Level 3: Output all options
--verbose Shortcut verbosity level 3
- Show this
EOF
 
    1
}
 
options_from_hal_file()
{
    HAL_SED_FILTER='s%^\s*<merge\s*key="input\.x11_options\.\(.*\?\)"\s*type="string">\(.*\)</merge>%\1=\2%'
    cat $HAL_FILE \
        | grep '<merge key="input.x11_options.' \
        | grep -v 'SHMConfig' \
        | sed -e $HAL_SED_FILTER
}
 
from()
{
     synclient -l \
        | grep '=' \
        | sed -e 's/\s//g' \
        | option;
key= $option|cut -f 1 -d '='`
            old_val= $option|cut -f 2 -d '='`
            new_val=`options_from_hal_file|grep $key|cut -f 2 -d '='`
 
            [ -z $new_val ];
                [ $VERBOSITY_LEVEL == 3 ] && -e "\e[1;30m$key = $old_val\e[0m"
            [ $old_val != $new_val ];
                [ $VERBOSITY_LEVEL -ge 1 ] && -e "\e[1m$key = \e[1;31m$old_val \e[1;4;32m$new_val\e[0m"
                synclient "$key=$new_val"
            # The HAL file and the life configuration are in sync
                [ $VERBOSITY_LEVEL -ge 2 ] && -e "\e[1m$key = \e[4m$new_val\e[0m"
           
}
 
do_from=0 [ $# -gt 0 ]; do
"$1"
        --from-hal)
            do_from=1
            ;;
        --verbose)
            VERBOSITY_LEVEL=3
            ;;
        --verbosity)
            VERBOSITY_LEVEL=$2
           
            ;;
        -)
            usage
            ;;
   
  [ $do_from == 1 ];
from
usage
 
# vim: set shiftwidth=4 tabstop=4 expandtab: 

References

XKB compose sequences

I just ended a post about inserting special characters in VIM with the remark that I should find out how to insert special punctuation marks using just XKB, so I set out to find out how to add these to the list of existing compose options for XKB. Turns out that I should have simply taken another look at the configuration file for Compose mode (/usr/X11R6/share/X11/locale/en_US.UTF-8/Compose on my system).

Now I learned how to easily type a bunch of characters that I find myself using so often that I know their Unicode numbers by heart. This going to save my a ton of time and annoyance, and there’s no longer any need to remember the VIM digraphs either, although these were equally easy to remember.

Char.XMLHTMLXKB compose
&#8212;&mdash;Compose - - -
&#8211;&ndash;Compose - - .
&#8230;&hellip;Compose . .
&#8216;&lsquo;Compose < '
&#8217;&rsquo;Compose > '
&#8220;&ldquo;Compose < "
&#8221;&rdquo;Compose > "

VIM tips for editing prose

I was transcribing a draft for a manuscript. Using VIM, of course. But, I found my VIM skills to be lacking somewhat, enough to become sufficiently annoyed to investigate the holes.

Word wrapping

The first thing that I wanted to learn to remember was how to control word wrapping and, especially, how to rewrap text.

I had noticed already that on my current machine, VIM enables word wrapping by default for .txt files. I liked this, except I had forgotten long ago (or never properly remembered) how to rewrap lines. This can be done with gq. gq operates on the current selection or on the argument (a number of words/characters/sentences/paragraphs/etc).

Soon, I decided to turn my .txt into a simple TeX file (to be able to add annotations using TeX comments). This disabled the word wrapping, so I had to find the setting to control this. There's actually two settings:

  • wrapmargin defines how close the text may approach the right edge of the VIM window before it starts wrapping,
  • whereas textwidth tells VIM to start wrapping when a fixed number of characters is approached.

Because VIM doesn't do wrapping by default for .tex files, I added the following modeline to the bottom of my draft:

% vim: set textwidth=80 spelllang=nl:

Note that I find 80 characters way too small for most programming tasks, but very convenient as a width for reading prose from a screen. On occasion, I've even used width: 80ex; in the CSS of a website.

Sentences and paragraphs

A few movement commands that I've never used enough to remember well are {/} and (/). } and { are used to move a paragraph forward or backward, respectively;) and ( are used to move a whole sentence forward or backward. This is particularly useful while editing prose.

To quickly select a paragraph, for example, you can easily move to the beginning of the paragraph using {, press v to start a selection and go to the end of the paragraph with } (or type 2} to also select the next).

If you want to delete a sentence, go to the start of the sentence (using either ( or )) and type d). It’s as easy as that.

If deleting the sentence fucked up the formatting of your paragraph, reformat by going to the beginning of the paragraph and typing gq}.

Proper punctuation and other special characters

TeX offers a method to construct special characters using plain ASCII source files. In the past, in my inability to properly configure everything for UTF-8, I’ve often made use of this. In TeX, \'e will be turned into é, \"i into ï, etc. This can be convenient, but it’s much more convenient to have an environment that’s properly configured for UTF-8. To enter special characters on my US keyboard layout (standard in The Netherlands), I’ve added compose:ralt to my XKB options. Using this option I can press Right Alt followed by a punctuation character, followed by a character to combine it with.

Clearly, constructing special characters on the level of X holds many advantages over having to do this differently for each and every application. This way I can also type in ë in this HTML <textarea> instead of having to type &euml;. (In HTML, it’s actually better to use a numeric character reference, such as &#235; instead of &euml;, because that doesn’t require the loading of the DTD, but that’s another rant altogether.)

If you don’t have an accommodating XKB configuration, it’s still possible to enter the characters directly at the VIM level. In VIM, :help digraph (see also the on-line HTML version) tells you everything about it. In short, use Control+K followed by a punctuation character, followed by a character to compose special characters in a way similar to X.

What’s very nice about VIM’s default setup is that it allows you to also easily create proper opening and closing single and double quotes. In TeX these are traditionally done using combinations of back-ticks (`) and apostrophes ('). TeX’s default behavior can be problematic, a good reason to switch to Unicode.

char.VIM digraphTeX
Ctrl+K, ", 6``
Ctrl+K, ", 9''
Ctrl+K, ', 6`
Ctrl+K, ', 9'

Something else that becomes very easy with VIM’s digraphs is entering proper punctuation characters, such as em/en dashes. These are done by following Ctrl+K with a hyphen and a capital N or M. In TeX these could already be done by simply entering two or three hyphens, but if you prefer it that way, you’re probably better of with the UniCycle plugin for VIM, which I personally don’t dig. Anyway, you’re running out of excuses to let -- appear in your production documents.

char.VIM digraphTeX
Ctrl+K, -, N--
Ctrl+K, -, M---

I have to admit that I’ve waited an awful long time before finding this out. I’m ashamed to tell you that I’ve often gone to Alan Wood’s Unicode resources to look up a character and copy/paste it into an application. 😳 Now, at least I don’t have to further embarrass myself when I’m using VIM.

What remains is to configure XKB in such a way that I don’t need to use VIM digraphs for punctuation. Then I will no longer need to use character references for punctuation at times like these, when I’m typing HTML/XML outside of VIM (or, worse, using copy/paste from VIM into this <textarea>, which I just did :oops:). Let’s see if I can get XKB to compose these using the same combinations as VIM. That is where I’ll continue my quest next time.

wmsystray, a notification area DockApp for WindowMaker

Many X apps these days require a system tray. GNOME and KDE have system tray applets enabled in their panels by default. WindowMaker doesn’t have a panel. It supports DockApps, which are, of course, much cooler. 😛

wmsystray

wmsystray 0.2.0 with 2 icons wmsystray 0.2.0 with 3 icons

wmsystray (homepage) is a DockApp that supplies a notification area for Window Maker. The version that is in Portage (0.1.1) was maintained by Matthew Reppert. Was; I installed it almost a year ago and it crashed as soon as I started the first app which used the system tray. I went looking for a newer version than the one in Portage. I found it in a comment on its dockapps.org page by Vlad Dinulescu. He had fixed a few bugs and released a new version (0.2.0).

Unfortunately, version 0.2.0 suffers some problems of its own: it crashes when I quit Skype and it sometimes “loses” the uTorrent icon (usually when I have to restart the DockApp after quiting Skype).

Why isn’t this built into Window Maker?

I would much prefer it if Window Maker natively supported a notification area, preferably with the icons appearing within or replacing the App Icons. I’m not the first to have this wish. There exists a patch already, but the WM devs don’t like the idea.

An alternative to wmsystray

Something that I completely overlooked until I started writing this post is this, which looks like a decent alternative to wmsystray. I’ll have to try if that one works better than wmsystray. Some time…

My Window Maker “desktop” configuration

During the ten years of my love-hate relationship with X-Windows, I’ve often tried and enjoyed using full-fledged desktop environment (starting with KDE and later sometimes GNOME too), but, given time, I always gravitate back to WindowMaker.

XTerm

I’m not so big on the whole desktop metaphor thing. The longer I’ve been using Unix-like systems, the more dependent I’ve become on the command-line. My current Window Maker configuration is a testimony to this. If you look at my Main Window Maker Workspace, you’ll notice that I actually use an Xterm instead of a desktop. Also, I don’t have a wallpaper. No wallpaper, no icons: I just want my prompt, in a nice font.

I despise graphical file managers. It feels like having to type without fingers. I’m not advocating the use of a command-line shell for new users or anything but for somebody like me who is used to calling programs “by hand”, a GUI is pure torture. With a GUI, I end up having to find a specialized program for a lot of mundane tasks which can be accomplished in Bash with a simple loop and a few filters. Renaming a few hundred files springs to mind.
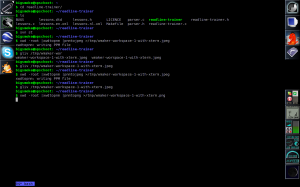
My Main Window Maker Workspace

My Main Window Maker Workspace

GNU Screen provides for “tabs” in my XTerms and some other features I’ve come to depend on. That’s why, upon login, my Main Workspace appears with xterm -e screen already started. The Windows Key + T fires up another XTerm with a fresh screen session. If I want to attach to a previous Screen session, I use Window+Shift+T. This starts an XTerm without Screen.

Starting applications

I don’t like the applications menu, but I’ve added a few applications to it anyway to be able to bind short keys to them (Win+F for Firefox and Win+T for XTerm). When I want to start any other application, I use the run dialog (bound to Win+R) or I execute the app from an XTerm window. I don’t usually start applications by clicking their App Icon.

File viewers (such as Mplayer, Gliv, Okular, xlview, and wordview) are always started from an XTerm or from Firefox, because that’s where all my file arguments originate. These apps don’t need App Icons, especially because I don’t see them as belonging to any particular workspace.

All keyboard shortcuts

Instead of Alt, I use the Window key (Mod4) a lot for my keyboard shortcuts.

cat /home/bigsmoke/GNUstep/Defaults/WindowMaker |grep -i key|sed -e 's/^\s*//'|sort
CloseKey = "Mod4+Q";
FocusNextKey = "Mod4+Tab";
FocusPrevKey = "Shift+Mod4+Tab";
HideKey = "Mod4+H";
HideOthersKey = "Shift+Mod4+H";
HMaximizeKey = None;
LowerKey = "Mod4+Down";
MaximizeKey = "Mod4+M";
MiniaturizeKey = "Mod4+period";
ModifierKey = Mod4;
MoveResizeKey = None;
NextWorkspaceKey = "Shift+Mod4+Right";
PrevWorkspaceKey = "Shift+Mod4+Left";
RaiseKey = "Mod4+Up";
RootMenuKey = "Mod4+A";
ScreenSwitchKey = None;
ShadeKey = "Mod4+minus";
ToggleKbdModeKey = None;
WindowListKey = "Mod4+W";
WindowMenuKey = "Mod4+Escape";
WindowShortcut10Key = None;
WindowShortcut1Key = "Mod4+1";
WindowShortcut2Key = "Mod4+2";
WindowShortcut3Key = "Mod4+3";
WindowShortcut4Key = "Mod4+4";
WindowShortcut5Key = "Mod4+5";
WindowShortcut6Key = "Mod4+6";
WindowShortcut7Key = None;
WindowShortcut8Key = None;
WindowShortcut9Key = None;
Workspace10Key = None;
Workspace1Key = "Mod4+F1";
Workspace2Key = "Mod4+F2";
Workspace3Key = "Mod4+F3";
Workspace4Key = "Mod4+F4";
Workspace5Key = "Mod4+F5";
Workspace6Key = "Mod4+F6";
Workspace7Key = "Mod4+F7";
Workspace8Key = "Mod4+F8";
Workspace9Key = None; 

One annoyance is that, when switching through the Windows in the current Workspace (in my case, with Win+Tab and Win+Shift+Tab), doesn’t disappear unless an additional key press is given (such as an extra Tab).

Another annoyance is in my configuration. My keyboard has some space after every 4 function keys. Also, like always, the function keys are a bit far removed from the home row on the keyboard. So, I should consider switching through workspaces with Win+1 through Win+7 instead of Win+F1 through Win+F7. I’ve now bound the Win+<number> keys to a Window 1 to 10, but this seems to be terribly broken anyway in Window Maker (I can only switch to the first window in the first workspace this way). Also, I probably wouldn’t use it even if it did work, unless if they displayed the window numbers on the app icons or something and if they did the numbering on a workspace basis instead of globally. So, I’m probably going to change this soon.
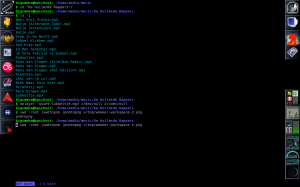
My Window Maker Workspace for Audio

My Window Maker Workspace for Audio

Workspaces

One of the things I’ve always like about X Window Managers is the support for multiple virtual desktops, called Workspaces in Window Maker. I use topical workspaces, one workspace per application category. It’s possible to configure app icons to always start the application in the correct workspace regardless of where it is started from. My Workspaces are called Main, Audio, Video, Down, w3dev and Image.

If I want to look at my downloads, I know that I just have to switch to Workspace 4 (Down) regardless of what I’m downloading. The same goes when I want to switch a song (be it in Mplayer (in an XTerm) or in the Last.fm Player): I press Win+F2.

Here’s a list of all the app icons divided over my different workspaces:

  1. Main: Window Maker Preferences, Google Earth, Skype, Filelight
  2. Audio: Rosegarden, Audacity, Hydrogen, Last.fm, Grip, Ardour, ReZound, Gnaural
  3. Video: Cinelerra
  4. Down: BitTorrent, uTorrent, Transmission
  5. w3dev: MSIE, Konqueror
  6. Image: Krita, Inkscape, GIMP, Color Schemer Studio

I have a widescreen laptop, so I display all these per-workspace icons (with the Clip) vertically at the top left. At the bottom left I display the “Icon List”. This is used by WindowMaker for icons that are not already in the Clip or in the Dock.

At the right I display the dock with the XTerm icon and the Firefox icon. There’s also an Emacs icon there from the time that I wanted to learn Emacs. (Sadly, I know VIM too well to change.)

Below that, also at the right, are the Dock Apps: wmsystray, WMWiFi, wmmixer, WMitime, wmbattery, and of course wmMoonClock.

Why Window Maker

With all this reluctance to click on icons, you’d wonder if I wouldn’t be better of trying something more keyboard centric such as StumpWM (the successor of Ratpoison).

If I will, I’ll let you know.
« Older posts

© 2024 BigSmoke

Theme by Anders NorenUp ↑