Smokes your problems, coughs fresh air.

Tag: bash (Page 2 of 2)

Tracking WordPress in a Subversion vendor branch

Two months prior to writing a script to upgrade MediaWiki installations using Subversion vendor branches, I wrote something similar for WordPress. It’s a little bit more limited and should really incorporate some of the improvements made for the MediaWiki version, but it worked fine so far:

cat upgrade-wordpress.sh 
#!/bin/bash
 
svn_repo_url=file:///var/svn/blog.omega-research.org/vendor/wordpress/
last_version=$1
new_version=$2
 
tmp_dir=`mktemp -d` $tmp_dir
 version $*;
    "Downloading and extracting WordPress version $version..."
 
    [ -z `svn ls $svn_repo_url|grep $version` ];
        branch= $version |sed -e 's/\.[0-9]\+$//'`
        archive_file="wordpress-$version.tar.gz"
        md5_file="wordpress-$version.md5"
 
        wget "http://wordpress.org/$md5_file"
        wget "http://wordpress.org/$archive_file"
 
        [ `md5sum $archive_file |cut -f 1 -d ' '` != `cat $md5_file` ];
            "MD5 sum did not match!" >&2
            1
       
 
        tar --extract --ungzip --transform "s/^wordpress/$version/" --file $archive_file
        svn_load_dirs.pl $svn_repo_url -t $version current $version
   
 -
svn merge "$svn_repo_url$last_version" "$svn_repo_url$new_version" .

I’m actually planning to make both scripts a little bit more generic (in the sense that svn_repo_url becomes an external param) and to track future changes to them using GitHub’s Gist. (How ironic is that, tracking an script for Subversion using Git?)

Tracking MediaWiki in a Subversion vendor branch

Vendor branches are the proper™ way of merging upstream changes in your web application installations. In Subversion, managing vendor branches isn’t so easy as it is in Git. Still, vendor branches make it much easier to track upstream.

From before I first deployed the Omega Research Wiki, I already used svn to track changes to my MediaWiki installation. However, for upgrading from one upstream release to the next, I used diff and patch. This isn’t the most reliable of methods as is exemplified by doing a diff comparing a fresh MediaWiki download with the actual files in my repo (which are supposed to belong to the same version).

What’s basically a shortcoming of svn is that I can’t just say:

svn merge http://svn.wikimedia.org/svnroot/mediawiki/tags/REL1_15_0/phase3/ \
http://svn.wikimedia.org/svnroot/mediawiki/tags/REL1_15_1/phase3/ .

This would have been incredibly helpful, because now I’m keeping a vendor branch not because of local modifications to upstream, but just to be able to merge cleanly.

In Subversion, maintaining a vendor branch by hand is quite some work, because you need to do a checkout first before you can import each version. (My working copy is normally a checkout of /trunk, not of /vendor/mediawiki.) Luckily, Subversion is distributed with a handy Perl script, svn_load_dirs.pl, which can do most of the heavy lifting.

Still, I didn’t feel like having to do to many manual steps, such as typing in the painfully long URLs for merging, so I decided to wrap the whole process into a nice little Bash script:

cat upgrade-mediawiki.sh
#!/bin/bash
 
svn_repo_url=file:///var/svn/wiki.omega-research.org/vendor/mediawiki/
 
merge=1 [ $# -gt 2 ] # Process extra options
    "$1"
        --no-merge)
            merge=0
            ;;
   
   
 [ $# -ne 2 ]; then
    "Usage: $0 [--no-merge] version version"
    1
 
last_version=$1
new_version=$2
 
tmp_dir=`mktemp -d` $tmp_dir
 version $*;
    "Downloading and extracting MediaWiki version $version..."
 
    [ -z `svn ls $svn_repo_url|grep $version` ];
        branch= $version |sed -e 's/\.[0-9]\+$//'`
        download_file="mediawiki-$version.tar.gz"
        download_url="http://download.wikimedia.org/mediawiki/$branch/$download_file"
 
        wget $download_url || { "Downloading $download_file failed">&2; 1; }
        tar --extract --ungzip --transform 's/^mediawiki-//' --file $download_file
        svn_load_dirs.pl $svn_repo_url -t $version current $version
   
 - [ $merge == '1' ];
    svn merge "$svn_repo_url$last_version" "$svn_repo_url$new_version" .
 0

The script only downloads and imports each specified version if that version doesn’t already exist in /vendor/mediawiki/. Also, because it has a --no-merge option, you can download all the old versions of MediaWiki that you’ve ever used, so that you can go back and compare old versions of your installation with the factory version. Of course, this is only useful if you were already tracking your installation in svn at the time, and even then not really. 😉

Anyway, the important thing is that you can use the script to download the version you’re running now and the version you want to upgrade too. I wanted to make a big jump, from 1.11.1 to 1.15.0 (I had put of the upgrade for a long time, because I first wanted to learn more about vendor branches):

Of course, as always, you need to check if the patch went well. My own results were a vivid demonstration of the unreliability of my previous method:

svn st|grep '^C'
C      languages/messages/MessagesKrj.php
C      languages/messages/MessagesWar.php
C      languages/messages/MessagesSe.php
C      languages/messages/MessagesFrc.php

Luckily, these were all files I was sure I hadn’t modified:

i `svn st|grep '^C'|sed -e 's/^C //'`; mv $i.merge-right.r32 $i; svn resolved $i;
Resolved conflicted state of 'languages/messages/MessagesKrj.php'
Resolved conflicted state of 'languages/messages/MessagesWar.php'
Resolved conflicted state of 'languages/messages/MessagesSe.php'
Resolved conflicted state of 'languages/messages/MessagesFrc.php'

Apparently, a previous upgrade hadn’t turned my MediaWiki installation exactly into 1.11.1.

My quest for the ultimate Bash prompt

On my new laptop (a Lenovo T61) I was still using the default Gentoo prompt in Bash. This was kind of a shame since my last Gentoo installation (on what is now my sister’s Ubuntu machine) had a beautifully customized prompt. It was time to dig up the old escape codes.

The old

To recover my old prompt I didn’t even need to go rummaging through old files. All I had to do was to find an old forum post on the Gentoo forums. But, I noticed immediately that I didn’t like this old prompt so much anymore. It had too much stuff and it didn’t have very strong root warning signals.

My old Bash prompt

My old Bash prompt

My old Bash prompt as root

My old Bash prompt as root

The new

My new Bash prompt

My new Bash prompt

For my new prompt I used the PROMPT_COMMAND environment variable. The command in this environment variable is always run before the prompt is displayed. This means that, if you set the PS1 environment variable from this command, you can change your prompt depending on circumstances.

I pushed the dollar (or hash)-sign all the way to the left because I often type in very long commands. A little more space is used if there are background jobs, but only if there are background jobs.

My new Bash prompt with background jobs

My new Bash prompt with background jobs

You should never be root for too long, so I made being root very noticeable (and even slightly annoying):

My new Bash prompt as root (and with background jobs)

My new Bash prompt as root (and with background jobs)

The following is the code I use to create the prompt. Stick it wherever you want it (e.g. in your user’s bashrc or in the system-wide bashrc) and adjust it to look nice and play nice with the rest of your environment. The code isn’t pretty, but it does what it has to. 😉

prompt_command {
  XTERM_TITLE="\e]2;\u@\H:\w\a"
 
  BGJOBS_COLOR="\[\e[1;30m\]"
  BGJOBS=""
  [ "$(jobs | head -c1)" ]; BGJOBS=" $BGJOBS_COLOR(bg:\j)";
 
  DOLLAR_COLOR="\[\e[1;32m\]"
  [[ ${EUID} == 0 ]] ; DOLLAR_COLOR="\[\e[1;31m\]";
  DOLLAR="$DOLLAR_COLOR\\\$"
 
  USER_COLOR="\[\e[1;32m\]"
  [[ ${EUID} == 0 ]]; USER_COLOR="\[\e[41;1;32m\]";
 
  PS1="$XTERM_TITLE$USER_COLOR\u\[\e[1;32m\]@\H:\[\e[m\] \[\e[1;34m\]\w\[\e[m\]\n\
$DOLLAR$BGJOBS \[\e[m\]"
} PROMPT_COMMAND=prompt_command

More info

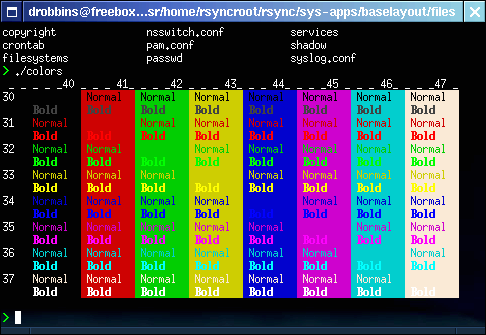
If you want to learn more about customizing your prompt, there’s an article up at IBM’s website. From it, I stole this nice color table:

Console color codes table

Console color codes table

Another tip: you can type man console_codes for everything about … console codes.

Creating a bash fork bomb

Logged into a Unix machine? Does “ulimit -a” say that the max number of user processes is unlimited? Then type the following to crash the machine (provided it uses bash, or another shell with compatible syntax):

:(){ :|:& };:

What does it do? It creates a function named “:”, which calles itself, and sends the output to itself.

You’d better find out how to protect your machine if it also states that the max number of user processes is unlimited. Even a hight limit can be dangerous, such as 15000.

Microsoft batch file meets bash shellscript

Luca City, who already shared a nice readline keyboard shortcut with me, wrote me again on May 14 to share another unrelated, but very interesting trick:

Hi Rowan,
as you are interested in tricks and curiosities, I send you a thing.
I wanted a script to be runnable from both windows and linux and I found out a way to do it. Generally you can have two different files, one for each OS, but I started with this goal in mind and then it became a challenge. After trying a bit, playing with the strangest tricks of the two batch languages (bat and bash), I ended up with this solution. Actually it is not so useful 🙂 but anyway…

Well Luca, regardless of the usefulness of your script, I happen to think that it’s pure genius, so I’m going to share it here:

off ; +v # > NUL
; GOTO { true; } # > NUL
 
GOTO WIN
# bash part, replace it to suit your needs
0
 
:WIN
REM win part, replace it to suit your needs

Give the script a .bat extension for Windows and set the executable bit(s) for Unix.

Thanks, Luca, for sharing another nice trick with us.

Bypassing smart completion in Bash

Luca Citi, a nice Italian Ubuntu user, just gave me an excellent tip in response to my list of Readline keyboard shortcuts. Modern Linux distributions such as Ubuntu and Gentoo can easily be configured for Bash to use smart completion. With smart completion enabled, instead of just looking among all the available files and directories without discrimination, TAB will be able to more accurately adjust its list of available completions depending on the program for which arguments are being sought.

An example of smart completion is that completions for the cd command will only include actual directories and no longer any regular files. Luca gave me another good example: completions for the kpdf command will only include files with the .pdf extension.

Myself, I’ve been bitten by smart completion a few times because I’d want to complete a command argument towards a filename which wasn’t supported by the smart completion rules. Luca gave me his typical example of such a case: his smart completion configuration includes only entries from the fstab as valid mount points for the mount command. But, what if you want to do an ad-hoc mount? Will you just have to type out the full mount point without auto completion? That’s what I used to think before Luca told me about the Alt+/ shortcut. In Bash, this shortcut will act as the TAB-key would without smart completion enabled.

Of course, I’ve updated my list of Readline keyboard shortcuts to include Alt+/.Thanks Luca! 🙂

Newer posts »

© 2025 BigSmoke

Theme by Anders NorenUp ↑