Smokes your problems, coughs fresh air.

Tag: dd

Writing bootable disk images (.iso, .img, etc.) to a USB stick from Windows

Because Windows doesn’t have dd, and I want to write the latest Mint LTS release to a USB task, I had to face the unpleasant task of finding a Windows tool to perform what’s a basic Unix operation. The good news is that I found one, and it’s open source: Win32 Disk Imager. It even has a version ≥ 1, titled: “Holy cow, we made a 1.0 Release”.
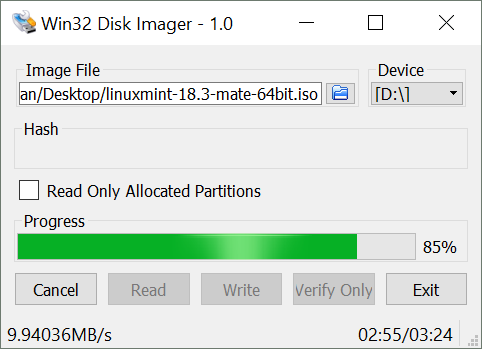
A screenshot of Win32 Disk Imager at work, writing Linux Mint 18.3 MATE 64bit to my SanDisk USB stick.

Win32 Disk Imager at work, writing Linux Mint 18.3 MATE 64bit to my SanDisk USB stick.

I found another open source tool, UNetbootin, but that tool didn’t recognize my non-MS-format formatted USB stick (which already tauted the installer for a previous Mint release).

In the end, Win32 Disk Imager also choked on the funky partition table left by the previous boot image, so I had to find out how reset the USB disk’s partition table in Windows:

C:\WINDOWS\system32>diskpart

Microsoft DiskPart version 10.0.16299.15

Copyright (C) Microsoft Corporation.
On computer: YTHINK

DISKPART> list disk

  Disk ###  Status         Size     Free     Dyn  Gpt
  --------  -------------  -------  -------  ---  ---
  Disk 0    Online          238 GB      0 B        *
  Disk 1    Online           29 GB    28 GB

DISKPART> select disk 1

Disk 1 is now the selected disk.

DISKPART> list partition

  Partition ###  Type              Size     Offset
  -------------  ----------------  -------  -------
  Partition 1    Primary           1706 MB  1024 KB
  Partition 2    Primary           2368 KB  1707 MB

DISKPART> select partition 2

Partition 2 is now the selected partition.

DISKPART> delete partition

DiskPart successfully deleted the selected partition.

DISKPART> select partition 0

The specified partition is not valid.
Please select a valid partition.

There is no partition selected.

DISKPART> select partition 1

Partition 1 is now the selected partition.

DISKPART> delete partition

DiskPart successfully deleted the selected partition.

DISKPART> create partition primary

DiskPart succeeded in creating the specified partition.

DISKPART> exit

Leaving DiskPart...

C:\WINDOWS\system32>

Growing a qcow2 image file

First, convert it to raw:

qemu-img convert system.qcow2 -O raw system.raw

Then use DD to append a zero all the way at the end of the new file. It will automatically create a hole in the file:

# Make sure the seek value is bigger than the file size, otherwise it would put a zero somewhere in the middle of the file.
dd if=/dev/zero of=temp.raw bs=1 count=1 seek=100G

Then resize the partition. I did that by binding the image to a loop device:

losetup /dev/loop0 system.raw

Then you can use fdisk on /dev/loop0 to alter the partition table. parted didn’t want to resize my file sytem because it had a journal (argh…) so I just used fdisk and made sure that the start of the partition was the same.

Then you detach the loop device and attach the partition:

losetup -d /dev/loop0
# 32256 is 63*512. 63 is the start sector, which fdisk can tell you (with the u option)
losetup -o 32256 /dev/loop0 system.raw

Then I used resize2fs on /dev/loop0 and detached it again.

Increasing (encrypted) disk image size with dd

When you have a raw disk image file, you may need to increase its size at some point. With dd, you can do this:

dd conv=notrunc oflag=append if=/dev/zero of=backups bs=1M count=1024

This will add 1GB of zero data to the image file ‘backups’. You can then use resize2fs on it to increase the file system size (that is, if you use ext2/3/4):

e2fsck (-f) backups
resize2fs backups

However, if the disk image is a volume encrypted with cryptsetup + luks, first open it:

losetup /dev/loop/0 backups
cryptsetup luksOpen /dev/loop/0 encrypted-backups

Then resize the encrypted volume:

cryptsetup resize encrypted-backups
e2fsck (-f) /dev/mapper/encrypted-backups
resize2fs /dev/mapper/encrypted-backups

And I know, I still have to add LVMs to my set of skills…

Mounting partititions residing inside a disk image

When you’ve read a disk with dd or ddrescue into an image file, one of the things you want to do is mount the partitions inside it. But, how does one do that? The answer is using losetup, with a bit of knowledge of partition offsets.

First, you have to map the disk image to a loopback device:

# losetup /dev/loop/0 disk_image_file

Then use fdisk to print the partition table, displaying offsets in sectors:

# fdisk -lu /dev/loop/0

For my disk, that results in:

Disk /dev/sda: 250.0 GB, 250059350016 bytes
255 heads, 63 sectors/track, 30401 cylinders, total 488397168 sectors
Units = sectors of 1 * 512 = 512 bytes
Disk identifier: 0x00000000

   Device Boot      Start         End      Blocks   Id  System
/dev/sda1   *          63   482415884   241207911   fd  Linux raid autodetect
/dev/sda2       482415885   488392064     2988090   fd  Linux raid autodetect

You can see that the first partition begins at sector 63. Now we’re going to setup a new loop device, with the proper offset. A disk sector is 512 bytes long, so an offset of 63 sectors is 32256 bytes. Therefore, you setup the first partition with this command:

# losetup -o 32256 /dev/loop/1 disk_image_file

Then you can mount that loop device:

# mount /dev/loop/1 /mnt/mountpoint

© 2024 BigSmoke

Theme by Anders NorenUp ↑