Smokes your problems, coughs fresh air.

Author: Rowan Rodrik (Page 15 of 27)

Rowan is mainly a writer. This blog here is a dumping ground for miscellaneous stuff that he just needs to get out of his head. He is way more passionate about the subjects he writes about on Sapiens Habitat: the connections between humans, each other, and to nature, including their human nature.

If you are dreaming of a holiday in the forests of Drenthe (the Netherlands), look no further than “De Schuilplaats”: a beautiful vacation home, around which Rowan maintains a magnificent ecological garden and a private heather field, brimming with biological diversity.

FlashMQ is a business that offers managed MQTT hosting and other services that Rowan co-founded with Jeroen and Wiebe.

Copy-pasting to and from XTerms

By default, XTerms only supports the PRIMARY selection for copy and paste. The PRIMARY selection is the one that is used by most ‘modern’ X application when you select text. This text can then usually be pasted by clicking the middle/second mouse button. Because this selection is set whenever you select, it’s easily overwritten, often accidentally. That’s why most newer X apps offer a parallel copy/paste mechanism where the selection is only explicitly set by choosing “Cut” or “Copy” from the application’s “Edit” menu or from its context menu (or with the Control-X/C/V keyboard shortcuts). In X, this selection is called CLIPBOARD, just like in Windows where it’s the only selection.

X also has these selections called Cut Buffers, but these are considered obsolete. Maybe that’s just too bad, because they appear to be the only selections with persistence; the other selections, PRIMARY and CLIPBOARD, disappear when the application is quit. Apparently, this is a feature, because it enables content negotiation.

Anyway, XTerm can be configured to do anything and I want it to be CLIPBOARD aware, for two reasons: one is that I often copy things from applications that can only set the CLIPBOARD selection; another is that I want to be able to really copy something from the XTerm, without losing it as soon as I select something else (especially if that something else is something I want to replace with the selection).

So, I added the following to my VT100.Translations #override in .Xdefaults.XTerm:

XTerm*VT100.Translations: #override \
    ShiftInsert: insert-selection(CLIPBOARD) \n\
    Insert: insert-selection(PRIMARY) \n\
    Shift: insert-selection(CLIPBOARD) \n\
    Shift: select-start() \n\
    Shift: select-extend() \n\
    Shift: select-end(CLIPBOARD)

What this does:

  • This gives me an XTerm that pastes the content of the CLIPBOARD when I hold down Shift during my two-finger tab (I’m using a touchpad, so that works as a Btn2).
  • Because I don’t like moving my hands, I can do the same by pressing Shift+Insert.
  • I can use my Insert key without Shift to paste the PRIMARY selection.
  • To copy something to the clipboard, I hold down the Shift key while making the selection.

That’s how you can make use of the CLIPBOARD from your XTerm.

Sources

If you want to learn more.

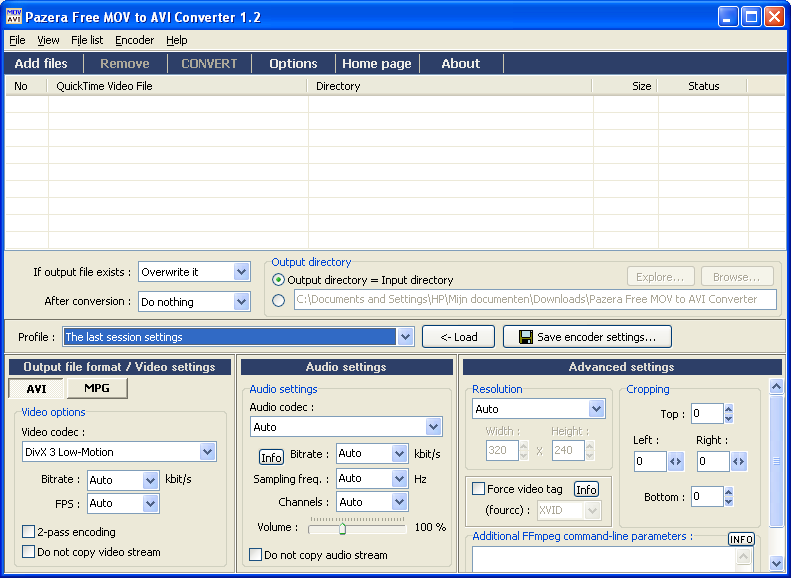
Pazera Free MOV to AVI Converter 1.2

Ewald wants to be able to make video/photo montages of his life at la Boucoule. While there last month, I helped him along with Windows Movie Maker (WMM) a bit. WMM doesn’t like Quicktime video’s (as outputted by his camera), so I found a simple Windows program that wraps around ffmpeg to convert these movies to AVI format: Pazera Free MOV to AVI Converter 1.2.

Pazera Free MOV to AVI Converter 1.2

To make the generated AVI work in WMM, a few settings need to be changed away from the default. For this purpose I added a custom profile. Here’s the INI file, “00 - Geschikt voor Windows Movie Maker.ini”:

[MAIN]
AppName=Pazera Free MOV to AVI Converter
AppVer=1.2
OutputFormat=AVI
[AVI]
VideoCodec=1
VideoBitrate=Auto
VideoFPS=Auto
Video2Pass=0
DoNotCopyVideo=0
[MPG]
VideoFormat=0
MPEGVersion=0
VideoBitrate=Auto
VideoFPS=Auto
Video2Pass=0
DoNotCopyVideo=0
[AUDIO]
AudioCodec=0
AudioBitrate=Auto
AudioSampling=Auto
AudioChannels=0
DoNotCopyAudio=0
Volume=100
[ADVANCED]
Resolution=0
ResWidth=320
ResHeight=240
ForceVideoTag=0
VideoTag=XVID
CropTop=0
CropBottom=0
CropLeft=0
CropRight=0
AdditionalParams=

Now, Ewald will only need to select the right profile if he wants to prepare his Quicktime movies for editing with Windows Movie Maker:

Profile selection in Pazera MOV to AVI Converter

AJAX comment preview for WordPress

Yesterday night, after mucking around with my Subversion repo for this blog for way too long, I finally stopped annoying the designer of my new theme and uploaded it, one and a half year after the last major redesign. Anyway, while implementing the new design for the comment list , I decided it was time to have comment previews.

At some time, I had already installed (but not activated) the Live Comment Preview plugin, but that’s client-side only. I removed it because I want the comment to show as it would after being piped through all the hooks and filters that comments normally get piped through. Enter the AJAX Comment Preview plugin:

Other preview plugins don’t know what sort of changes WordPress will make to a visitor’s comment, but this plugin uses AJAX and other buzzwords to send each previewed comment through WordPress’ inner voodoo.

The result? With the click of a button, your site’s visitors can preview their comments exactly as they will appear when they submit them for realies.

You just gotta love their phrasing. 🙂 Enjoy the new preview feature.

First steps with Subversion’s new merge tracking

A while ago we succeeded in upgrading the Debian server where I keep many of my SVN repositories. (The server was running on “testing”, but we hadn’t dared to upgrade it for a long time until it came time to make it “stable” again with Lenny.) On of the upgraded packages in Lenny is Subversion, now at 1.5.1, which means that I can finally start using subversions new merge tracking features.

To be able to use merge tracking for my existing repositories, I first have to upgrade these. From the svn 1.5 release notes:

The Subversion 1.5 server works with 1.4 and older repositories, and it will not upgrade such repositories to 1.5 unless specifically requested to via the svnadmin upgrade command. This means that some of the new 1.5 features will not become available simply by upgrading your server: you will also have to upgrade your repositories. (We decided not to auto-upgrade repositories because we didn’t want 1.5 to silently make repositories unusable by 1.4 — that step should be a conscious decision on the part of the repository admin.)

The only other machine I’m using these repos from is my laptop, which, running Gentoo, is already at Subversion 1.6.2. So, how do I upgrade?

First, I made a backup of all our SVN repos using a script that Halfgaar made to run from cron. After running that script, I initialized the upgrade procedure:

/var/svn
svnadmin upgrade blog.bigsmoke.us
svn-populate-node-origins-index blog.bigsmoke.us

The last command is unimportant, but may speed up the next few operations. The release notes again:

After running svnadmin upgrade, you may wish to also run the svn-populate-node-origins-index program on the repository. Subversion 1.5 maintains a node-origins index for each repository, and builds the index lazily as the information is needed. But for old repositories with lots of revisions, it’s better to create the index in one step, using the aforementioned tool, than to have live queries be slower until the index has built itself. See issue #3024 for details.

With my data safe and the repo upgraded, it’s time to actually test the new merge tracking features:

~/blog.bigsmoke.us # Enter working copy (on the same server)
 
# I'm now in the lichtgekruid branch.
svn switch file:///var/svn/blog.bigsmoke.us/trunk
svn add wp-content/plugins/openid
svn ci -m "I was convinced this was a change which didn't belong to my feature branch" wp-content/plugins/openid
 
svn switch file:///var/svn/blog.bigsmoke.us/branches/lichtgekruid
svn merge file:///var/svn/blog.bigsmoke.us/trunk
# The last command was a real kicker, not having to find and specify the correct range of revision numbers.
 
svn ci -m "Merged changes from trunk to 'lichtgekruid' branch."
svn switch file:///var/svn/blog.bigsmoke.us/trunk
svn merge file:///var/svn/blog.bigsmoke.us/branches/lichtgekruid
# (Another spontaneous orgasm.)
 
svn ci -m "Merged 'lichtgekruid' branch back into trunk."

Ok, I know I could have simply changed all these projects to use Git, and I like Git. I love its simplicity and flexibility. But, call me old-fashioned; I have an SVN fetish, and so far I find its merge tracking quite convincing.

Besides all the gotchas and pointers in the 1.5 release notes, there’s a lot more info about merge tracking in the SVN redbook.

HP LaserJet 6P under Ubuntu

Because Arnold Pilon is migrating his workplace to Apple, I could get his old PC and peripherals for free. Among its peripherals was an old HP LaserJet 6P, still perfectly working.

My sister didn’t have a printer yet. I was surprised that installing it on her Ubuntu machine was simply a matter of selecting the printer type from a list. I wonder: is this thanks to CUPS? Can I expect this to work in all distros that include CUPS these days?

Anyway, the printer works and the scanner too (of which I forgot to jot down the type). The scanner was supported by Xane without requiring any configuration. When it comes to hardware configuration, open source operating systems often beat those from Redmond.

Replacing the full contents of a Subversion working (sub)dir

The annoyances that I suffered earlier today during the upgrade of a WordPress plugin made me turn to my favorite text-editor to create a simple script, svn-replace-dir:

#!/bin/bash
 
usage() {
    cat <<"EOF"
$0 [--dry-run] <svn_dir> <replacement_dir>
 
This script replaces the contents of <svn_dir> with the contents of <replacement_dir>,
where <replacement_dir> is not an svn directory.
 
Copyleft 2010, Rowan Rodrik van der Molen <rowan@bigsmoke.us>
EOF
}
 
fatal_error() {
    message=$1
 
    -e "\e[1;31m$message\e[0m"
    1
}
 
usage_error() {
    error="Wrong usage."
 
    [ -n "$1" ];
        error=$1
   
 
    -e "\e[1;31m$error\e[0m"
    1
}
 
run_command() {
    -e "\e[1;34m$1\e[0m"
 
    [ $dry_run == 1 ] || $1
}
 
dry_run=0 [ $1 == '--dry-run' ];
  dry_run=1


[ $# == 2 ] || usage_error "Wrong number of arguments."
 
svn_dir= "$1"|sed -e 's#/$##'`
replacement_dir= "$2"|sed -e 's#/$##'`
begin_path=$PWD
 
#if [ "${svn_dir:0:1}" != "/" ]; then svn_dir="$PWD/$svn_dir"; fi
#if [ "${replacement_dir:0:1}" != "/" ]; then replacement_dir="$PWD/$replacement_dir"; fi
 
[ -d "$svn_dir" ] || usage_error "$svn_dir is not a directory."
[ -d "$replacement_dir" ] || usage_error "$replacement_dir is not a directory."
 
 
# Create all subdirectories in $svn_dir that do not yet exist
$replacement_dir
find . -mindepth 1  d -print | sed -e 's#^./##' | d;
    $begin_path/$svn_dir
    # Doesn't the destination directory already exist?
    [ ! -d "$d" ];
        run_command "svn mkdir '$d'"
   
 
# Copy all files from $replacement_dir to $svn_dir
$begin_path/$replacement_dir
find .  f -print | sed -e 's#^./##' | f;
    $begin_path
    run_command "cp '$replacement_dir/$f' '$svn_dir/$f'" # FIXME: Quoting problem
 
# Remove all files that do no longer exist in $replacement dir
$begin_path/$svn_dir
find .  f -print | grep -v '.svn' | f;
    [ ! -f "$begin_path/$replacement_dir/$f" ];
        run_command "svn rm '$f'"
   
 
# Remove all subdirs that do no longer exist in $replacement dir
$begin_path/$svn_dir
find . -mindepth 1  d -print | grep -v '.svn' | d;
    [ ! -d "$begin_path/$replacement_dir/$d" ];
        run_command "svn rm '$d'"
   
 0

Using the script is simple:

svn-replace-dir simple-tags new-simple-tags|less -R

It replaces all the contents of the first directory (simple-tags in the example) with those of the second directory and it deletes everything that is no longer present in the second dir. In the process, it does all the necessary calls to svn mkdir, svn rm and (in the next version) svn add.

diff tells me that the script has done its work correctly:

diff -x .svn -ruN simple-tags new-simple-tags
# Emptiness is bliss :-) 

This is another one of these occasions when Git would have made life so much easier. Luckily, at least there’s GitHub to host this script as a Gist. Check there if you want to fetch the newest version of this script.

Create DVDs from any random movie format on Windows

Ewald wanted to be able to create DVDs from the Quicktime movies exported by his digital camera. As a result of being away from my familiar Linux tools, I had to find something that´d work on Windows XP.

First, I tried MediaCoder, a Windows front-end (done in XUL) for mencoder, ffmpeg and more of these familiar tools. It was flexible enough, but quite awkward from an end-user perspective and also frustrating if you’re used to calling the supporting commands directly from the CLI.

Luckily, I stumbled upon ConvertXtoDVD, a commercial Windows-only program which proved to be very user-friendly and intuitive without requiring the user to understand the ins and outs of each an every supported media format.

At 40 euro it’s a bit expensive if, like me, you’re used to staying at the free software side of things, but I’d daresay it’s actually worth the money if you’re not an obsessive geek with obscene amounts of free time on his hands.

Dumping a bunch of MP3s as WAV files

I just used the following command for converting a directory with a bunch of MP3s to WAV. Does someone know a command that is shorter? I find mine a bit convoluted to say the least.

mkdir wav
ls *mp3|while i;  mpg123 --stdout "$i" > wav/ $i|sed -r -e 's/^([0-9]+) .*$/\1/'`.wav;

The directory looks like this:

$ ls -1
01 - Meant to Be.mp3
02 - Reflections.mp3
03 - Semester Days.mp3
04 - Friend.mp3
05 - True Gemini.mp3
06 - Down the Road.mp3
07 - Tulip Trees.mp3
08 - Not Alone.mp3
09 - Woods of Chaos.mp3
10 - Twilight.mp3
[en] Readme - www.jamendo.com .txt
[es] Lee me - www.jamendo.com .txt
[fr] Lisez moi - www.jamendo.com .txt
[it] Readme - www.jamendo.com .txt
License.txt
Rob Costlow - Solo Piano - Woods of Chaos.1.0.jpg

XTerm configuration

I just created a gist for my XTerm configuration (separated from the rest of my X resources). Here’s a snapshot of the current version:

XTerm*background: black
XTerm*Foreground: Grey

XTerm*faceName: Liberation Mono
XTerm*faceSize: 10

XTerm*on2Clicks: regex [^  \n]+

XTerm*bellIsUrgent: true

! Make the terminal 127 by 42 characters in size
XTerm*geometry: 127x44+64+0

! By default, XTerm composes special chars with META. With this setting I can work my readline magic instead.
XTerm*metaSendsEscape: true

! Bracketed paste mode requires the allowWindowOps resource to be true 
XTerm*allowWindowOps: true

XTerm*saveLines: 1000

! Don't jump to the bottom when there's output
XTerm*VT100*scrollTtyOutput: false

XTerm*VT100.Translations: #override \
    ShiftInsert: insert-selection(CLIPBOARD) \n\
    Insert: insert-selection(PRIMARY) \n\
    Shift: insert-selection(CLIPBOARD) \n\
    ShiftUp: scroll-back(1) \n\
    ShiftDown: scroll-forw(1)


! vim: set syntax=xdefaults expandtab tabstop=4 shiftwidth=4:

Old Window Maker screenshot from April 2004

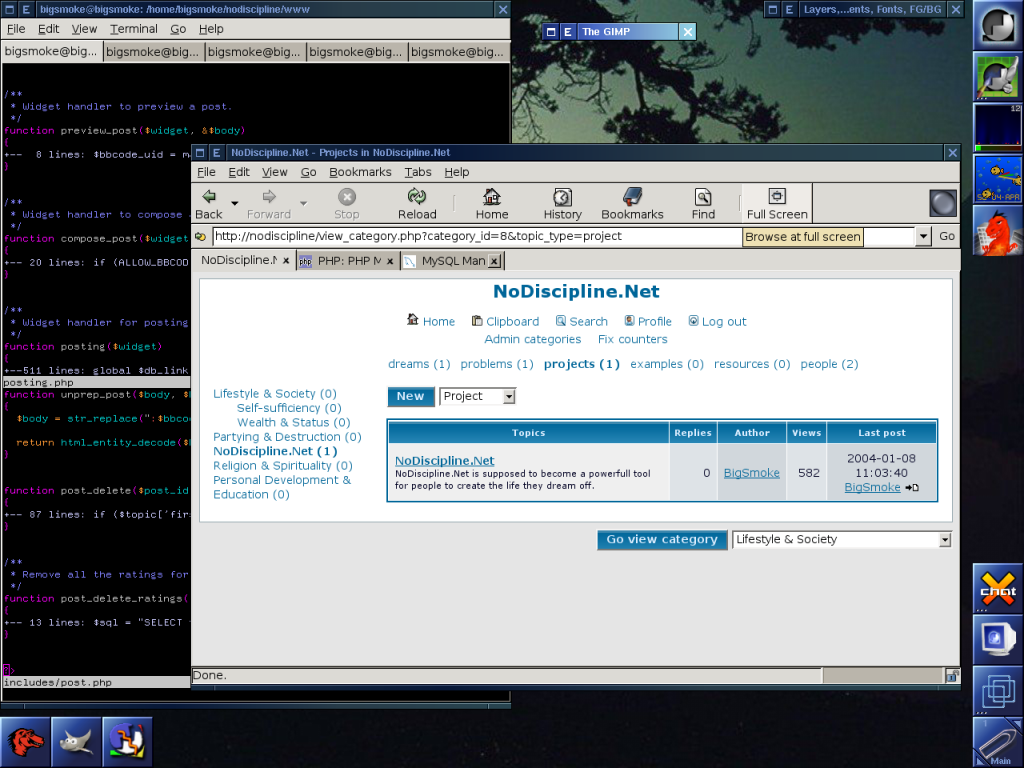
While cleaning up old images, I came across a screenshot of an old Window Maker configuration that I ran in 2004. It looks a bit different from my current configuration, but not that different, which just goes to say how little Window Maker has changed in the last five years. The main difference I see in terms of Window Maker capabilities is that Window Maker now has font anti-aliasing support.

I notice that I was actually using VIM’s folding support at the time. Also, it’s funny to see that I was in the middle of the development of a (now stale, even more badly written) fork of phpBB.

Window Maker Workspace (2004)

Window Maker Workspace (2004)

« Older posts Newer posts »

© 2024 BigSmoke

Theme by Anders NorenUp ↑